


chatglm-sdk源码分析
本文最后更新于 2025-07-04,文章超过7天没更新,应该是已完结了~
ChatGLM SDK源码已下载并解析,借此文章来分享下我个人的解析过程以及收获~话不多说,上车!
首先关于SSE、EventSource的基础知识可以
在这篇文章查阅,模型(除了图片模型)调用采用流式应答,所以可以先去看看其概念及基本实现。
要完整分析整个项目的架构设计和设计模式,我们需要从以下几个方面入手:
核心类与职责
项目中的关键设计模式
代码逻辑的整体流程
不同组件之间的关系
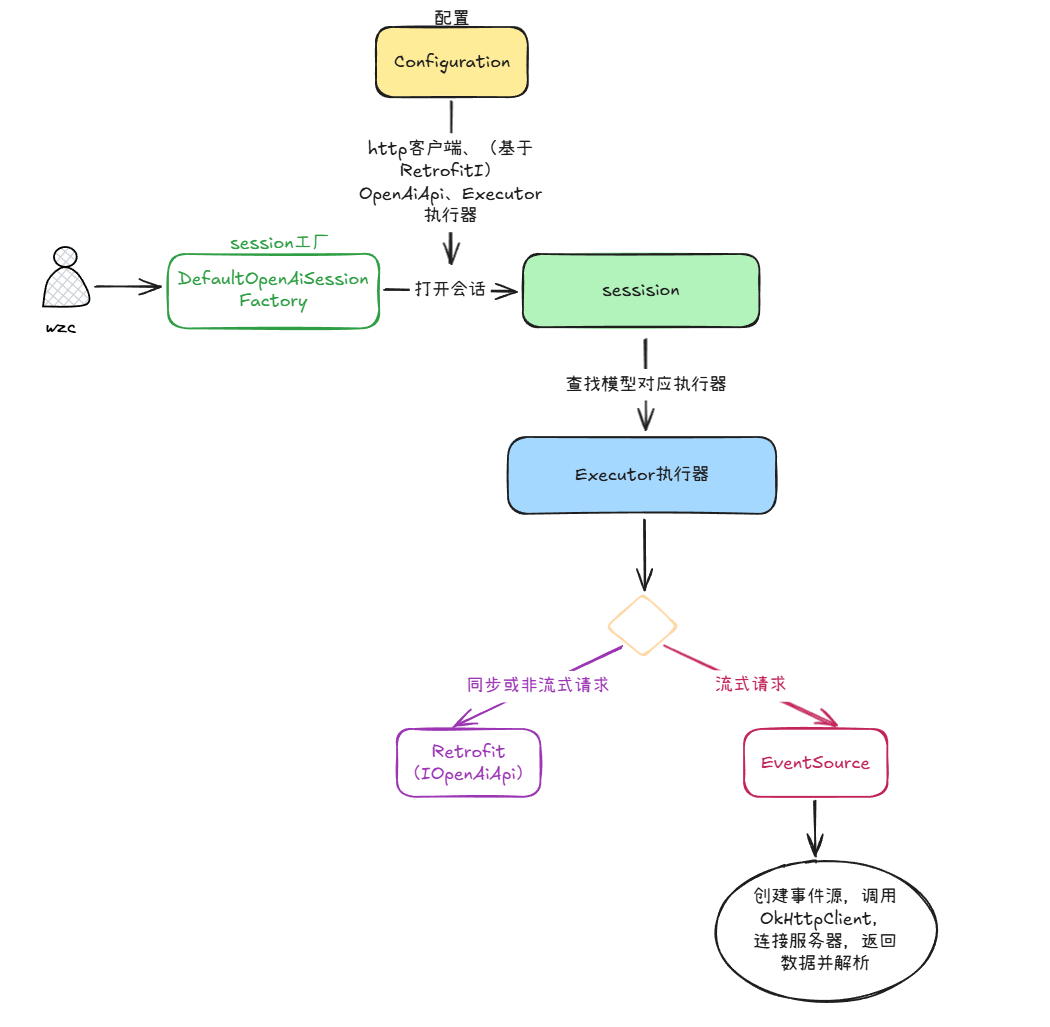
1. 整体架构流程图
我们可以根据测试案例,来读懂整个项目的流程走向:
@Slf4j
public class ApiTest {

    private OpenAiSession openAiSession;

    @Before
    public void test_OpenAiSessionFactory() {
        // 1. 配置文件
        Configuration configuration = new Configuration();
        configuration.setApiHost("https://open.bigmodel.cn/");
        configuration.setApiSecretKey("764d6c3f7231f0dcfb2daba77215f112.n23GxnTrlVlKBDvH");
        configuration.setLevel(HttpLoggingInterceptor.Level.BODY);
        // 2. 会话工厂
        OpenAiSessionFactory factory = new DefaultOpenAiSessionFactory(configuration);
        // 3. 开启会话
        this.openAiSession = factory.openSession();
    }

    /**
     * 流式对话;
     * 1. 默认 isCompatible = true 会兼容新旧版数据格式
     * 2. GLM_3_5_TURBO、GLM_4 支持联网等插件
     */
    @Test
    public void test_completions() throws Exception {
        CountDownLatch countDownLatch = new CountDownLatch(1);

        // 入参;模型、请求信息
        ChatCompletionRequest request = new ChatCompletionRequest();
        request.setModel(Model.GLM_3_5_TURBO); // chatGLM_6b_SSE、chatglm_lite、chatglm_lite_32k、chatglm_std、chatglm_pro
        request.setIncremental(false);
        request.setIsCompatible(true); // 是否对返回结果数据做兼容,24年1月发布的 GLM_3_5_TURBO、GLM_4 模型,与之前的模型在返回结果上有差异。开启 true 可以做兼容。
        // 24年1月发布的 glm-3-turbo、glm-4 支持函数、知识库、联网功能
        request.setTools(new ArrayList<ChatCompletionRequest.Tool>() {
            private static final long serialVersionUID = -7988151926241837899L;

            {
                add(ChatCompletionRequest.Tool.builder()
                        .type(ChatCompletionRequest.Tool.Type.web_search)
                        .webSearch(ChatCompletionRequest.Tool.WebSearch.builder().enable(true).searchQuery("小傅哥").build())
                        .build());
            }
        });
        request.setPrompt(new ArrayList<ChatCompletionRequest.Prompt>() {
            private static final long serialVersionUID = -7988151926241837899L;

            {
                add(ChatCompletionRequest.Prompt.builder()
                        .role(Role.user.getCode())
                        .content("小傅哥的是谁")
                        .build());
            }
        });

        // 请求
        openAiSession.completions(request, new EventSourceListener() {
            @Override
            public void onEvent(EventSource eventSource, @Nullable String id, @Nullable String type, String data) {
                ChatCompletionResponse response = JSON.parseObject(data, ChatCompletionResponse.class);
                log.info("测试结果 onEvent:{}", response.getData());
                // type 消息类型,add 增量,finish 结束,error 错误,interrupted 中断
                if (EventType.finish.getCode().equals(type)) {
                    ChatCompletionResponse.Meta meta = JSON.parseObject(response.getMeta(), ChatCompletionResponse.Meta.class);
                    log.info("[输出结束] Tokens {}", JSON.toJSONString(meta));
                }
            }

            @Override
            public void onClosed(EventSource eventSource) {
                log.info("对话完成");
                countDownLatch.countDown();
            }

            @Override
            public void onFailure(EventSource eventSource, @Nullable Throwable t, @Nullable Response response) {
                log.info("对话异常");
                countDownLatch.countDown();
            }
        });

        // 等待
        countDownLatch.await();
    }
...
走一遍源码
1、配置信息

首先是通过 Configuration 简单配置 密钥等信息。
然后通过factory.openSession()创建SessionFactory创建Session,这一步基于之前传入的configuration的配置信息创建出来Seesion
@Override
    public OpenAiSession openSession() {
        // 配置日志拦截器
        HttpLoggingInterceptor httpLoggingInterceptor = new HttpLoggingInterceptor();
        // BODY、HEADERS 等,决定了输出的详细程度。
        httpLoggingInterceptor.setLevel(configuration.getLevel());

        // 1.开启 Http 客户端
        OkHttpClient okHttpClient = new OkHttpClient
                .Builder()
                .addInterceptor(httpLoggingInterceptor)
                //每个请求发出前调用 BearerTokenUtils.getToken(...) 生成 Token,并把 "Authorization"、"Content-Type"、"User-Agent" 等信息添加到请求
                .addInterceptor(new OpenAiHTTPInterceptor(configuration))
                .connectTimeout(configuration.getConnectTimeout(), TimeUnit.SECONDS)
                .writeTimeout(configuration.getWriteTimeout(), TimeUnit.SECONDS)
                .readTimeout(configuration.getReadTimeout(), TimeUnit.SECONDS)
                .build();

        //以便后续其他组件(比如 Retrofit)也能使用同一个http客户端,保证配置一致性
        configuration.setOkHttpClient(okHttpClient);

        // 2. 创建 API 服务
        IOpenAiApi openAiApi = new Retrofit.Builder()
                .baseUrl(configuration.getApiHost())
                .client(okHttpClient)
                .addCallAdapterFactory(RxJava2CallAdapterFactory.create())
                .addConverterFactory(JacksonConverterFactory.create())
                .build().create(IOpenAiApi.class);

        configuration.setOpenAiApi(openAiApi);

        // 4. 实例化执行器
        HashMap<Model, Executor> executorGroup = configuration.newExecutorGroup();

        return new DefaultOpenAiSession(configuration, executorGroup);
    }
2、配置模型、请求信息
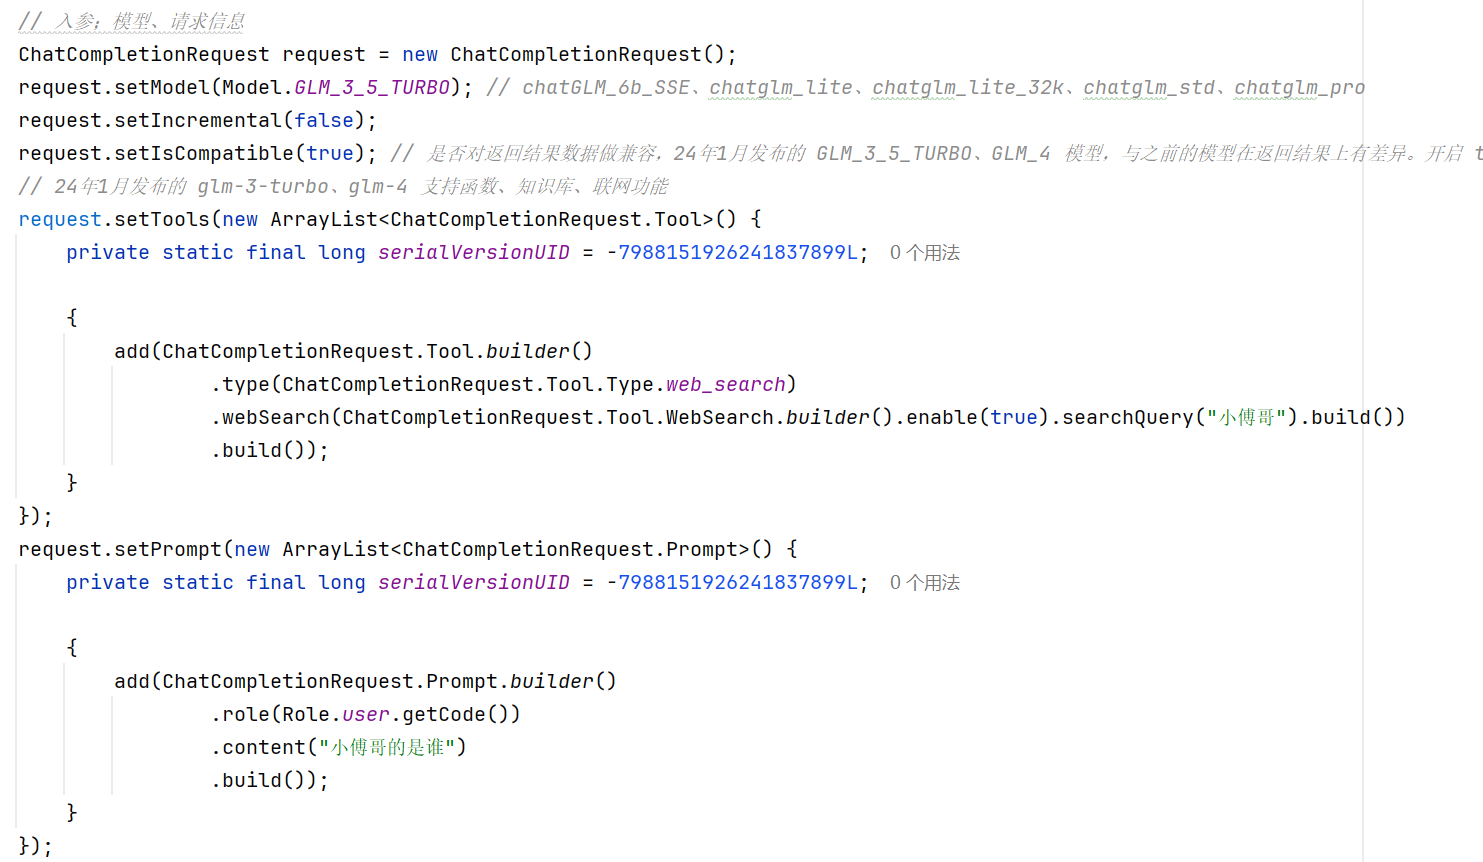
这一块代码配置了请求携带的参数,具体来源参考智谱AI平台的开发文档。
3、发起请求
深入到completions 方法看看做了啥:
@Override
    public EventSource completions(ChatCompletionRequest chatCompletionRequest, EventSourceListener eventSourceListener) throws Exception {
        Executor executor = executorGroup.get(chatCompletionRequest.getModel());
        if (null == executor) throw new RuntimeException(chatCompletionRequest.getModel() + " 模型执行器尚未实现!");
        return executor.completions(chatCompletionRequest, eventSourceListener);
}基于我们之前设置的执行器,传的是GLM_3_5_TURBO ,所以使用的是GLMExecutor 这个执行器来调用api,所以这个执行器其实还有解耦的功能哦,依照于不同的请求模型(chatglm_std、chatglm_pro、GLM_4...),可以调用到不同的执行器上去。
public HashMap<Model, Executor> newExecutorGroup() {
this.executorGroup = new HashMap<>();
// 旧版模型,兼容
Executor glmOldExecutor = new GLMOldExecutor(this);
this.executorGroup.put(Model.CHATGLM_6B_SSE, glmOldExecutor);
this.executorGroup.put(Model.CHATGLM_LITE, glmOldExecutor);
this.executorGroup.put(Model.CHATGLM_LITE_32K, glmOldExecutor);
this.executorGroup.put(Model.CHATGLM_STD, glmOldExecutor);
this.executorGroup.put(Model.CHATGLM_PRO, glmOldExecutor);
this.executorGroup.put(Model.CHATGLM_TURBO, glmOldExecutor);
// 新版模型,配置
Executor glmExecutor = new GLMExecutor(this);
this.executorGroup.put(Model.GLM_3_5_TURBO, glmExecutor);
this.executorGroup.put(Model.GLM_4, glmExecutor);
this.executorGroup.put(Model.GLM_4V, glmExecutor);
this.executorGroup.put(Model.GLM_4_Plus, glmExecutor);
this.executorGroup.put(Model.GLM_4_0520, glmExecutor);
this.executorGroup.put(Model.GLM_4_Lng, glmExecutor);
this.executorGroup.put(Model.GLM_4_AirX, glmExecutor);
this.executorGroup.put(Model.GLM_4_Air, glmExecutor);
this.executorGroup.put(Model.GLM_4_FlashX, glmExecutor);
this.executorGroup.put(Model.GLM_4_Flash, glmExecutor);
this.executorGroup.put(Model.GLM_4_AllTools, glmExecutor);
this.executorGroup.put(Model.COGVIEW_3, glmExecutor);
return this.executorGroup;
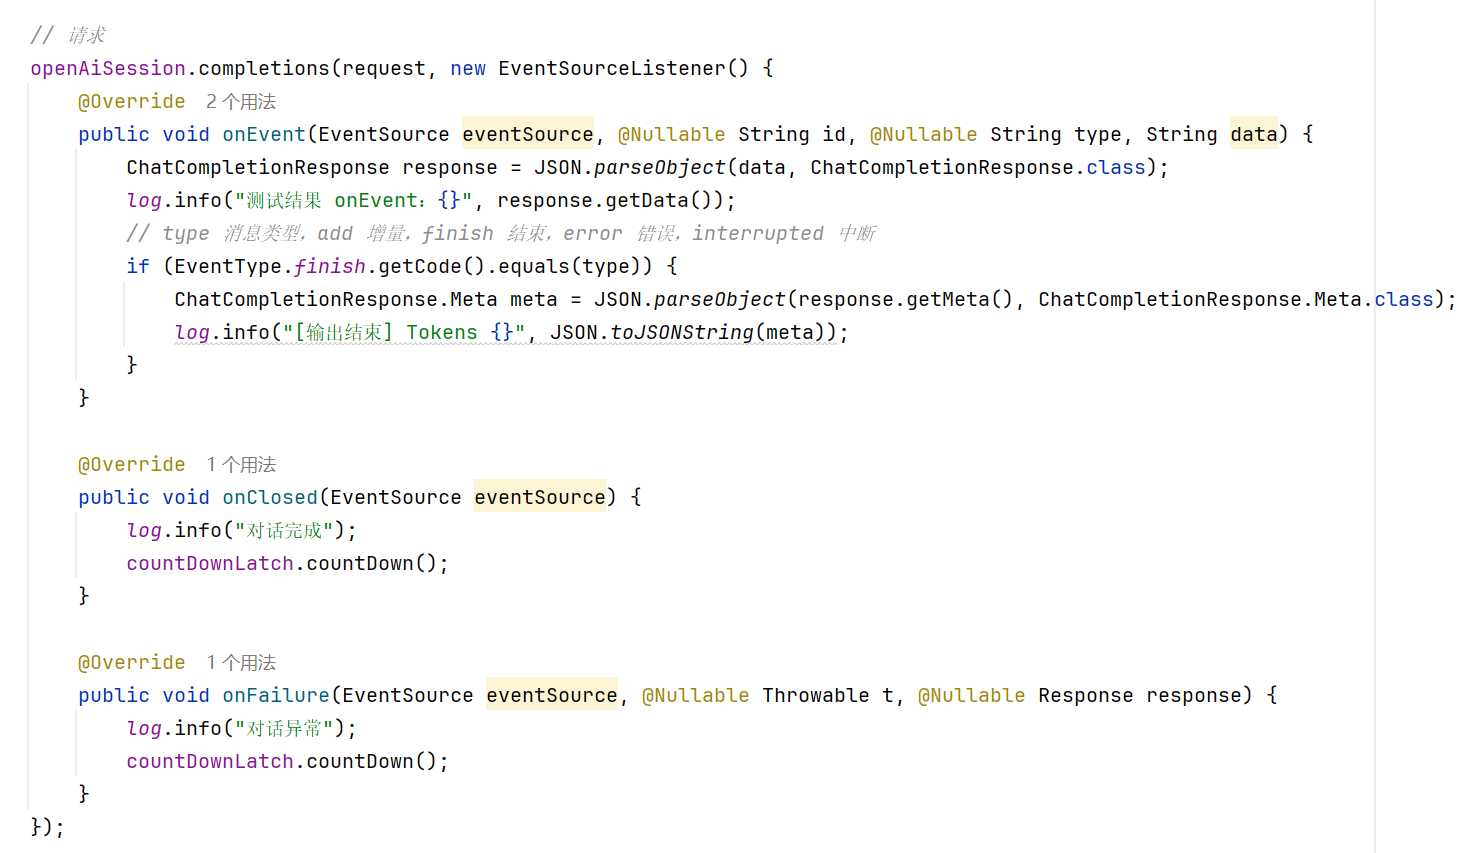
}最后就是监听返回数据了,这一块参考SSE、EventSource相关知识。
那如果是非流式、同步呢,用到的是Retrofit 包装了IOpenAiApi ,这样直接调用IOpenAiApi 接口就可以实现发起请求了。
IOpenAiApi openAiApi = new Retrofit.Builder()
                .baseUrl(configuration.getApiHost())
                .client(okHttpClient)
                .addCallAdapterFactory(RxJava2CallAdapterFactory.create())
                .addConverterFactory(JacksonConverterFactory.create())
.build().create(IOpenAiApi.class);2.核心类与职责
3.涉及到的设计模型
1. 工厂模式(Factory Pattern)
@Override
public OpenAiSession openSession() {
    // 1. 日志配置
    HttpLoggingInterceptor httpLoggingInterceptor = new HttpLoggingInterceptor();
    httpLoggingInterceptor.setLevel(configuration.getLevel());

    // 2. 构建 HTTP 客户端
    OkHttpClient okHttpClient = new OkHttpClient.Builder()
            .addInterceptor(httpLoggingInterceptor)
            .addInterceptor(new OpenAiHTTPInterceptor(configuration))
            .connectTimeout(configuration.getConnectTimeout(), TimeUnit.SECONDS)
            .writeTimeout(configuration.getWriteTimeout(), TimeUnit.SECONDS)
            .readTimeout(configuration.getReadTimeout(), TimeUnit.SECONDS)
            .build();
    configuration.setOkHttpClient(okHttpClient);

    // 3. 创建 API 服务对象
    IOpenAiApi openAiApi = new Retrofit.Builder()
            .baseUrl(configuration.getApiHost())
            .client(okHttpClient)
            .addCallAdapterFactory(RxJava2CallAdapterFactory.create())
            .addConverterFactory(JacksonConverterFactory.create())
            .build().create(IOpenAiApi.class);
    configuration.setOpenAiApi(openAiApi);

    // 4. 通过工厂方法返回一个会话实例
    return new DefaultOpenAiSession(configuration);
}
详细解析:
隐藏复杂性
该方法封装了 HTTP 客户端的创建、日志拦截器的配置、Retrofit 实例的构建等细节,调用者只需关心通过工厂获取一个OpenAiSession实例,而无需了解内部复杂的初始化逻辑。解耦和易扩展
采用工厂模式后,当需要变更客户端配置或者切换其他实现时,只需修改工厂内部代码,不影响使用方。设计思想
这里的DefaultOpenAiSessionFactory负责会话对象的创建,它将各种依赖(如 OkHttpClient、Retrofit API 对象)注入到Configuration中,最终生成一个OpenAiSession对象,体现了工厂方法隐藏创建细节的设计思想。
2. 策略模式(Strategy Pattern)
代码案例:
下面展示了两个不同的执行器实现,用于处理旧版和新版模型接口调用:
Executor 接口定义
public interface Executor {
    /**
     * 流式对话:发送请求,并通过监听器接收返回事件
     */
    EventSource completions(ChatCompletionRequest chatCompletionRequest, EventSourceListener eventSourceListener) throws Exception;
}
旧版执行器:GLMOldExecutor
public class GLMOldExecutor implements Executor {

    private final Configuration configuration;
    private final EventSource.Factory factory;

    public GLMOldExecutor(Configuration configuration) {
        this.configuration = configuration;
        this.factory = configuration.createRequestFactory();
    }

    @Override
    public EventSource completions(ChatCompletionRequest chatCompletionRequest, EventSourceListener eventSourceListener) throws Exception {
        // 构造请求 URL,将模型标识嵌入到 URL 中
        Request request = new Request.Builder()
                .url(configuration.getApiHost()
                        .concat(IOpenAiApi.v3_completions)
                        .replace("{model}", chatCompletionRequest.getModel().getCode()))
                .post(RequestBody.create(MediaType.parse("application/json"), chatCompletionRequest.toString()))
                .build();

        // 通过工厂创建 EventSource,并返回事件流
        return factory.newEventSource(request, eventSourceListener);
    }
}
新版执行器:GLMExecutor
public class GLMExecutor implements Executor, ResultHandler {

    private final Configuration configuration;
    private final EventSource.Factory factory;
    private IOpenAiApi openAiApi;
    private OkHttpClient okHttpClient;

    public GLMExecutor(Configuration configuration) {
        this.configuration = configuration;
        this.factory = configuration.createRequestFactory();
        this.openAiApi = configuration.getOpenAiApi();
        this.okHttpClient = configuration.getOkHttpClient();
    }

    @Override
    public EventSource completions(ChatCompletionRequest chatCompletionRequest, EventSourceListener eventSourceListener) throws Exception {
        // 构造新版统一接口的请求 URL,不再在 URL 中携带模型参数,而是在请求体中传入
        Request request = new Request.Builder()
                .url(configuration.getApiHost().concat(IOpenAiApi.v4))
                .post(RequestBody.create(MediaType.parse(Configuration.JSON_CONTENT_TYPE), chatCompletionRequest.toString()))
                .build();

        // 根据是否需要兼容旧版响应进行包装
        return factory.newEventSource(request, chatCompletionRequest.getIsCompatible() ? eventSourceListener(eventSourceListener) : eventSourceListener);
    }
}
详细解析:
策略抽象
定义了一个Executor接口,使得调用者可以通过同一接口处理不同的执行策略。灵活选择策略
在配置中,会根据不同的模型类型(例如CHATGLM_LITE使用 GLMOldExecutor,GLM_3_5_TURBO使用 GLMExecutor)将具体执行策略注入进去,从而实现灵活调用。优点
如果后续新增其他类型的模型调用,只需增加对应的Executor实现,而不需要修改使用方代码,从而实现了扩展开放、修改封闭的设计原则。
3. 建造者模式(Builder Pattern)
// 使用建造者模式构造一个 Prompt 对象
ChatCompletionRequest.Prompt prompt = ChatCompletionRequest.Prompt.builder()
        .role(Role.user.getCode())
        .content("写个java冒泡排序")
        .build();

// 添加到请求列表中
request.setPrompt(new ArrayList<ChatCompletionRequest.Prompt>() {{
    add(prompt);
}});
详细解析:
目的
当对象需要设置多个参数时,建造者模式可以让代码更易读、更易维护。通过链式调用,可以直观地构造一个复杂对象。优势
避免了构造方法参数过多的情况,同时在设置默认值、可选值时也非常灵活,适用于 SDK 中复杂请求参数对象的创建。
4. 适配器模式(Adapter Pattern)
适配器模式的核心目的是让两个接口不兼容的类能够协同工作。它通过创建一个“中间人”类,将一个类的接口转换成客户端期望的另一种接口,从而达到兼容的目的。
public String toString() {
    try {
        if (Model.GLM_3_5_TURBO.equals(this.model) || Model.GLM_4.equals(this.model) || Model.GLM_4V.equals(this.model)) {
            Map<String, Object> paramsMap = new HashMap<>();
            paramsMap.put("model", this.model.getCode());
            if (this.messages == null && this.prompt == null) {
                throw new RuntimeException("One of messages or prompt must not be empty!");
            }
            // 适配:如果 messages 不为空就使用,否则使用 prompt
            paramsMap.put("messages", this.messages != null ? this.messages : this.prompt);
            // 其他参数处理…
            return new ObjectMapper().writeValueAsString(paramsMap);
        }
        // 默认旧版参数组装
        Map<String, Object> paramsMap = new HashMap<>();
        paramsMap.put("request_id", requestId);
        paramsMap.put("prompt", prompt);
        paramsMap.put("incremental", incremental);
        paramsMap.put("temperature", temperature);
        paramsMap.put("top_p", topP);
        paramsMap.put("sseFormat", sseFormat);
        return new ObjectMapper().writeValueAsString(paramsMap);
    } catch (JsonProcessingException e) {
        throw new RuntimeException(e);
    }
}
详细解析:
兼容处理
随着新版模型参数结构的变化(例如由prompt改为messages),这里使用适配器思想,将旧版参数转换为新版接口需要的格式。实现方式
判断如果新版模型使用,则将两个属性进行适配处理,使得原本使用prompt的调用者也能兼容新版接口。
5. 观察者模式(Observer Pattern)
观察者模式用于建立一对多的依赖关系,当对象状态发生变化时,所有依赖于它的观察者都会收到通知并自动更新。
openAiSession.completions(request, new EventSourceListener() {
    @Override
    public void onEvent(EventSource eventSource, @Nullable String id, @Nullable String type, String data) {
        ChatCompletionResponse response = JSON.parseObject(data, ChatCompletionResponse.class);
        // 根据事件类型处理返回数据,如“add”、“finish”等
        if (EventType.finish.getCode().equals(type)) {
            ChatCompletionResponse.Meta meta = JSON.parseObject(response.getMeta(), ChatCompletionResponse.Meta.class);
            log.info("[输出结束] Tokens {}", JSON.toJSONString(meta));
        }
    }
    @Override
    public void onClosed(EventSource eventSource) {
        log.info("对话完成");
    }
    @Override
    public void onFailure(EventSource eventSource, @Nullable Throwable t, @Nullable Response response) {
        log.error("对话异常", t);
    }
});
详细解析:
异步事件监听
SDK 在模型调用过程中采用了事件流(EventSource)的方式返回数据。观察者模式实现
调用方通过实现EventSourceListener接口来订阅和处理不同的事件(如数据接收、对话关闭、异常处理),使得整个事件驱动机制解耦了数据产生和处理的过程。
注意:
IOpenAiApi openAiApi = new Retrofit.Builder()
        .baseUrl(configuration.getApiHost())
        .client(okHttpClient)
        .addCallAdapterFactory(RxJava2CallAdapterFactory.create())
        .addConverterFactory(JacksonConverterFactory.create())
.build().create(IOpenAiApi.class);使用RxJava 作为回调类型